Showing posts with label techshop rdu. Show all posts

Wednesday, September 5, 2012

Etsy Craft Party Recap: Photos and Instructables


   Drum roll...the Etsy photos are now up on facebook. Thank you everyone who sent me photos especially Jill and Melanie. Thank you Scott Saxon of Techshop RDU plus the entire Techshop staff. Also, Ryan and Rob of Roth Brewing. You guys were awesome! And Mike Hinman. And Fabiola. Plus a bunch more people who I could probably fill up the rest of the post mentioning so I will just say thanks and stop while I'm ahead! Everyone rose to the occasion and had a great time. Thank you! Thank you! Thank you! We are now in the process of posting up Instructables for anyone who missed the shin-dig! Great time everyone! You can check out Instructables for the crafts we did here:

Friendship Bracelet Making
Custom Cards From Craft Paper
Make Your Own Shop Apron
Painting Wood with Oil Paints
Design Your Own Beer Glasses

We also had several other stations with events such as knitting and beading, but I failed to get enough photos of those so we'll leave them for another time. I hope that this will help connect members of the group who because of personal reasons or scheduling conflicts could not make it. Look forward to seeing everyone come out for SparkCon next week! Whoot! So excited about that!

As reminder, our next big meeting for Acorn to Oak Handmade will be in October when we make custom 3D kites. I love how much is being done in this art recently. A mix of old and new at the same time. You can sign-up here.

Also, do not forget SPOON FLOWER IS GIVING AWAY FREE FAT QUARTERS IN CELEBRATION. Coupon code: EtsyParty12. Pick yours up online today. :-) Alright, I think that's all. Have a great week everyone!

Friday, August 3, 2012

August 24th: Etsy Night of Craft 7-10 pm

       Yeah, it's time again for the annual Etsy Craft Party! A lot of you had a blast coming last year, we're rockin' it again. Roth is celebrating with $3 drinks (even the good stuff) and we're having a food truck come. Techshop RDU is also hosting so we are throwing out the red carpet! DELICIOUS fun! Based on the two big parties we threw last year, we decided our group prefers free wheeling and dealing with multiple tables set-up with projects for people to jump from one to the other and try or sample. Do what you want! A buffet of treats for the eyes and fingers. Please feel free to come hang out and bring a friend, we will have tons of supplies and projects to give away. You do not have to be a member to come. Children and families welcome.

You can sign-up here on meet-up! Please, please, please, sign-up. The more people we have come, the more free stuff Michaels is sending....so the more the merrier! :-)

Right now, we have the following planned, if you have an idea you want to add or suggest, shoot me an e-mail at: dsmcginn1@lisashay.com. Creativity welcome. :-) At the moment, I have our projects divided up by area, more will be added at we get closer. :-) Some people may recognize some of the awesome projects from last year, if you missed doing something last year, now is your chance to do it this year.  And try your hand at something new.

Location (Forge):

Blacksmithing (Nash Page): Watch traditional metal armour being crafted. Nash is the blacksmith instructor at Techshop RDU and Dream Coach. He will be giving away several small projects as well as generally just having fun. You are welcome to hang out with him and watch the process.

Sand Metal Casting(Evan Daniels): One of the great instructors at Techshop, Evan is going to be hanging out with Nash demonstrating metal pouring techniques. If you are interested in casting in metal, please drop by. You are welcome to bring a piece you would like done before hand, flat shapes that can rendered in two dimensions work best. Please contact Evan if you have specific questions about what you want to bring.

Location (Roth Brewing):

Wire Twisted Jewelry: Come try your hand in the bar with traditional wire twisting and bead-work. We will be inside at the bar making drop earrings and necklaces. Free free to try your hand at making a new look for back to school.

Friendship Bracelets: Try your hand at this classic. Because somethings are too fun not to do.

Leather and Wood Block Painting: From ancient times, the oldest paintings in many cultures are wood because of it's durability and beauty. Acrylic paints were designed to specifically speed up this process for WW II by making fast drying oil paints. Acrylic paints work wonderfully on leather and wood. Right now, you're seeing nail polish shoes on runways everywhere. This is a great way to make art your own. Come try your hand painting your own pair of shoes or the wood blocks we will have available for people to take home. A great way to breath life into well-loved shoes. Check-out these amazing shoes done by Nicole. I love this trend right now.

Knitting Circle: Bring your current or new project to knit or crochet on comfy leather chairs. A great way to pass an evening in comfort with delicious beer. Yarn and tools will be available if you have never tried it before, this is a great time to start.


Location (Techshop Kitchen):

Potato Stamps: For those of us who like working with knives and paint, this project is for you. Many people don't realize that your kitchen is a great place to make quick and easy stamps with stuff you have lying around. Potatos make a great medium for custom stamps that can be done quickly and easily to create one of a kind cards and looks. Martha Stewart loves doing this favorite for custom Halloween gift bags, I'm sure you can dream up your own creation.
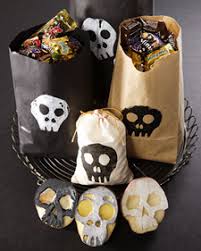
Custom Paper(Shannon): Microwaves are awesome if you like paper crafts, you can make your own design, dry it, and then apply potato stamps to the final product. Lacquer makes the entire look permanent. A great way to quickly design works of beauty.

Location (Techshop Conference Room):

Craft Swap: Bring a supply, take a supply. This is a great way to clean out space in your closet and look forward to starting a new project. We will have supplies available for people to take home and also keep any left-over supplies for future meetings. :-)

Apron Art (Dara): Where would the perfect project be without a fabulous apron to complete it? Make your own apron and decorate it with glitter, rhinestones, and other art. Now, you know you can dress for the occasion. Because art is fun!

Wood Carving: Try your hand at creating custom works of art in wood. You can do wood carving with a hot iron or knife. The results are unique creations.

More to Follow! Have a great day everyone and look forward to seeing you in a few weeks.


Thursday, August 2, 2012

Helmet Part 2: Cutting and Hammering Metal

             Alright, earlier this week we went over the basics of sketching or drafting a prototype and doing a mock-up. Eventually though, you have to move to the real stuff. In this case metal. After several mock-ups, Nash heads over to the machine shop to use a variety of shears of all sizes to mold the sheet metal into the basic shape outline before he starts hammering the pieces into shape. Each piece must be individually traced, cut, and double-checked for accuracy.
               Next, Nash takes each piece and begins to form it into shape with a series of hammers. The rough shape is generally worked with a large hammer and then he uses a rubber hammer against a leather head mold (yeah, project I got to sew for this part, my only real contribution to the design) to polish the shape out of the rough metal. You're left with a bunch of metal pieces curved in random directions unconnected to each other. They are pretty though with the metaled surface pitted and slight dents everywhere from the various hammers. It can take 3 hrs. to shape one piece into it's proper shape.
       Next up, check in as Nash begins to weld the helmet into it's final shape. I hope everyone is enjoying seeing this project take shape. :-)


Wednesday, June 27, 2012

Big Thanks to Ruthan for Our New Signage!

              Wow, after 2 years... we officially have snazzy office signs. Now when you walk up the stairs you'll know where to actually go. Pretty awesome. These are long overdue, but I tend to invest in the obvious last and focus on the making first. Probably not the best idea, but I do have great sewing machines! A girl has to have priorities.
              Now customers won't get lost trying to find the studio which is great. The front office is our sales office and the back office is the sewing "Sweatshop." If you need to reach the sales office, please e-mail me at: dsmcginn1@lisashay.com
               We are currently booked at full-time capacity so we are limiting new clients and designers to clients we feel are a good match. Primarily, designers that are ready to make the jump from one-offs to short production runs for light garments and store owners interested in carrying a local designer. Our minimum order for short runs is 100, but we prefer to do 1,000 on accessories in 4-6 styles. Full deposits are required up-front. Average turn around time is 2-6 weeks depending on the order size. Current times are averaging around 2 weeks, but now that we're fully booked this may go to 4 weeks.
                Have a great day and look forward to seeing what the week brings. And Ruthan, you are awesome! Thank you so much! The signs look great. You are our hero! Whoot! Whoot!

Tuesday, June 19, 2012

Acorn to Oak Arts and Craft Sale/Swap this Saturday!

         Shannon has decided to throw an impromptu arts and craft sale this weekend as she has been busy the past few weeks cleaning up her studio and workshop.  We will all be meeting at the Conference Room at Techshop RDU. Feel free to come pick up a some great deals. We will have extra tables for anyone who also has extra supplies floating around the house that they've been meaning to swap or sell for a while. Can't wait to see what people bring.

When: Saturday, June 23, 2012 from 10 am to 5 pm
Where: Techshop RDU Conference Room
            5905 Triangle Drive
            Raleigh, NC 27617
What: Arts and Craft Supply Sale/Swap
Who: Acorn to Oak Handmade Team
Why: Because New Projects are Fun

Friday, February 3, 2012

Textile Friday: 3D Printer Class in March


        Today I am pleased to bring you a guest blogger, Rye Gewalt, who some of you may remember from the summer Hello Etsy Event. This past Saturday Rye and Luis hunkered down over a bunch of parts and built a fun 3D printer in a few hours from scratch that you can currently see by the front desk and will be available for members to try out during our weekly meetings this month. Like many fellow artists in the area, I have been interested in rapid prototyping for a while, but lacked the knowledge or engineer bent to work one of these wonders. Now...I am fixing that oversight in March. :-) Like a happy little kid in a candy store. I hope you get the chance to take advantage of this opportunity too.


   As some of you know, our March meetings are rather ambitious and these two guys wanted to go through and test the series to make sure everything worked. I am pleased to say the model was a smashing success and is sitting by the front door at Techshop RDU if you would like to check it out.

So who is Luis Freeman and why in the world is he teaching this event?

"Luis Freeman’s day job is at IBM where he is involved in engineering and supply management chains.   He has been building and designing 3D printers as a hobby since 2007 when hobby 3D printers were more a matter of conjecture than hands on reality. He has has built several dozen machines of increasing complexity and currently has six operational machines that will be used to make parts for the class machines..  His printers utilize proven techniques from the Mendel and Openscad technology. The photo below shows Luis with his Mendel Prusa based machine which is considered an ideal machine for beginners due to it desktop size and large 8” x 8” x 8” product capacity. It is easy for even less nimble fingers to work with putting parts together without being so clunky that smaller frames have difficulty putting it together.   

This class provides an opportunity to build your own fully functional turnkey 3D printer in a group environment with a the help of knowledgeable hands-on instructor and the collective experience of classmates with similar interests.  Reinventing the wheel is seldom fun, but figuring things out with friends can be quite rewarding.
Each student in the class will build their own fully functional machine, starting with assembling the Arduino based electronics and finishing with the final checkout and test of their full system.  The build process takes place during five classes spaced over a four week period starting on March 6th  as detailed below.  

Week One (March 6th from 5-10 pm): You start with your basic kit and go over the basics. There are generally 50-200 separate parts that need to be soldered to your ardunio card as shown here such as stepper motors, capacitors, and hook-up connectors. This generally takes 2-3 hrs. depending on your prior experience soldering and doing electronics. No prior experience is necessary, but it is helpful if you have taken beginning soldering with Dr. Britton at Techshop RDU or have prior soldering experience.

Week Two (March 13th from 5-10 pm): You go to work on assembling the outside frame of the machine from wood. This part can be easy replicated with a 3D printer. Next you start filling in the gears and assembly that will house the extruder head and flat base you print on. You will use a combination of 3D printed parts and ball bearings. All the pieces have to come together cleanly and smoothly to function in real time. Extra steel wool will be provided for sanding and smoothing the parts.You will finish assembling the inside of the machine in the next class so focus on smoothing parts here is important.

Week Three (March 20th from 5-10 pm) Install and check all the parts you spend last week double-checking to create 2 platforms: 1 for the print head and the other for the print platform. You must check the that x and y axis move smoothly for when the extruder is finally installed. You will also practice printing parts on some extra printers Luis has on hand so you understand quality control when you need to replicate or replace parts on the machine. 

Week Four (March 27th from 5-10 pm and March 29th from 5-10 pm extra time for programming): On Tuesday you will finally install the extruder and wire all the parts you have been working on the past few weeks together. This includes wiring the printer cards, brackets, endstop brackets, and spool holder. You should be printing off your printer at this point. Thursday is available as time overflow in case you need to catch up. Luis will be going over using Openscad to do CAD design on your 3D printer and printing test parts. This time is for you to fine-tune and better understand how to use, fix, and work with your machine. This is what your Mendal Prusa will look like without the wooden frame around it. The wooden frame serves to stabilize the design and cause your pieces to printer with finer quality details." 

by Rye Dewalt

Happy Friday Everyone. I hope this post has been helpful about the next big leap forward in design innovation. And thank you Rye for all the photos and help. Neither of us could have done it without you.

If you have not already signed up, we have 2 slots left for the class on Skillshare: http://www.skillshare.com/How-to-Make-A-3D-Printer-Class-with-Louis-Freeman/1324082886

Monday, January 30, 2012

New Visitor: Mobile Convience Store

Need fuel to that late night art project? We had a lovely visitor over this past week, the new Mobil Mini-mart is coming to Roth complete with tasty snacks, chocolate, and deliciousness. You can check them out on facebook, twitter, or their webpage. Their website has a gps tracker so you can figure out exactly where it is down to the ft. I'm so excited to have this new tasty addition to our location and hope to have them drop by for some Tuesday night get togethers.

Plus, they carry miso soup along with the normal hot dogs, tacos, and snack food. A place after my own heart.

Check them out on facebook here: http://www.facebook.com/pages/Mobile-Mini-Mart/232470686814464

Can't wait to have them back again.


Saturday, January 7, 2012

Day Twenty: The Ultimate Cat Scratching Post

          Today's post comes to you courtesy of Mike Hinman. My only real contribution to this project was sewing a straight line down some carpet, but totally worth it. This project seemed too easy and awesome not to share. Mike's two kittens are holy terrors when it comes to trimming their nails so Mike designed the ultimate cat scratching post so that he would no longer have to suffer torn up furniture. I thought this was absolutely brilliant and pretty cost affordable so had fun putting it up on instructables here:

http://www.instructables.com/id/The-Ultimate-Cat-Scratching-Post/

I hope you have fun looking. And feel free to ask him questions at Techshop. Because cats are awesome! And cat scratching posts are just as awesome! Happy Weekend everyone! See ya back monday.

Tuesday, November 8, 2011

Day Ten: Seige Warfare

This week it's war in our neck of the woods with the Avalon Reenactments coming to town. Techshop is getting involved building small and large scale trebuchets. Trebuchets are an ancient launching device that armies used to target cities under attack. Pretty cool. This means that Nash has basically died and gone to heaven. Actually, most of the guys in the studios have. So where you may ask does fabric come into this? It's easy to see the wood and metal, but what a lot of people miss is the fact that the slingshot mechanism is made of rope and a fabric cup. Yes, fabric is everywhere around you. When you can cut your own desktop trebuchet in a few minutes on the laser cutter, or a larger seige size in a few hours (car drums are popular counterweights), you get a lot of fun fielding requests for how to make the fabric cups to place the projectiles in. The laser program is available saved on the epilog upstairs, or if you are doing a larger scale model, the measurements are 12 inches by 6 inches as follows to make a huge polygon on a larger standing model.

Simply place a hole in each end and sew the sides. We will be field-testing each division this coming weekend for the open house. I will be competing in the small division, Nash in the large. Good luck everyone who is putting theirs together this week. If you have any questions, you can find Nash at Techshop. Oh, and I will be launching flaming fire projectiles from mine so fair warning to the opposing team :-).

This is great week for mayhem.

Tuesday, October 25, 2011

Day Six: Free Quilting Kit On Listia

This week I'm listing the first of a new series of kits for our 2012 Etsy Meetings. This one is for a free intermediate quilting kit on Listia. It will be available until Weds next week for our Jan 10th meeting. I'm not an expert quilter by any means, but there's some great tools on the market to save you weeks of time cutting and sewing.
It's wonderful to use on left-over clothing or old linens. And the added speed makes it possible to do some of the more complicated styles like Amish Quilts. I love making interesting projects like this that create one of a kind works of art.
If you've ever heard Alabama Chanin talking about heirloom creations, quilts in my mind are a personal private one of a kind work of art. I will post more details on the meeting as it gets closer, but for now enjoy bidding on a kit for you to learn this week.

Have a great day. Look forward to tomorrow.

Monday, October 24, 2011

Day Five: Under $100 Open-Source Arduino Moving Projection Instructions

Today, we're venturing into the world of open-sourced prototyping. While a lot of what we do at Li Sashay is commercial, a good bit of it is also whimsical and fun. This is one example.
Jeff dropped by one evening asking me what I knew about sewing. One of those down the rabbit hole questions that is always promising. A few days and I had his prototype in my studio. Jeff is busy designing an open-source Arduino driven moving projector screen.
This is a really brilliant design and incredibly simple. I won't speak to the electronics (You can check out his blog for exact details and open source code), but you create a basic projection screen from blackout-fabric ($30) at any Jo-Anns. Use a basic straight curtain rod curtain design. At the top you attach straps at 8-12 inch ($2 for a yard) intervals that wrap around a hollow pole, I've seen plastic hollow tubing used ($10 Lowes). You then attach a controller to the entire curtain and for under $100 depending on where you source your parts. If you scrounge the board and motor, you can do this for closer to $50.
Voila, a moving projection screen that rolls up and down at your command. Now all it needs to do is Tweet.

Well, that's all for today folks. Have a great day. Check in tomorrow for more free ideas.

Monday, September 5, 2011

Evan Daniel: Metalworker

Roth Casting 02-11-11 (12) by MarkInRaleigh1
There's something magic about creating metal scultpure out of soft sand. I love watching Evan spin his wizardry. You never know exactly how your piece will turn out. There's an element of surprise in all good creations. The hold your breath moment. Evan has completely mastered it. I love going to his public pours once a month where he takes the rest of us uneducated types who come tottering out with a sculpture to make a mold of in random assortments of wood, clay, or plastic, and in a few minutes you have wonder.

He will be demonstrating pieces for the pour, September 17th from 7-9 pm and telling you how to create items that pour well. I invite you to come watch him and perhaps take home a piece of your own. We will have clay available to craft your own creation. You may come back for the next public pour Tues, October 11th for the Etsy Meet-up when we make them into metal sculptures.

Note: In his spare time when not doing metalwork, Evan is busy teaching and working in the area.